Index
- BMSBattery S series
- BMSBattery S06S
- S06ST (torque sensor version)
- S06S-BL (Bluetooth version)
- PWM signals
- Phase B current signal
- Throttle
- BMSBattery S06SC
- BMSBattery S12S
- BMSBattery bottle battery controller
- LCD control panel
- Kunteng mobile app
- Bluetooh
- How to open the controller and solder the programming header
- Hardware mods
- Other controllers
- BMSBattery S06P
- Kunteng 18 mosfets motor controller
- Lishui motor controllers
- JinHui motor controllers
- GreenEBikeKit
- Torque speed
- Motor control scheme of S06S controller
- BLDC 6 steps
- PWM schemes
- So, Which PWM Technique is Best? (Part 1)
- So, Which PWM Technique is Best? (Part 2)
- So, Which PWM Technique is Best? (Part 3)
- So, Which PWM Technique is Best? (Part 4)
- So, Which PWM Technique is Best? (Part 5)
- So, Which PWM Technique is Best? (Part 6)
- So, Which PWM Technique is Best? (Part 7)
- PWM control and Dead Time Insertion
- Low inductance motors
- Throttle Control Modes
- Phase angle FOC
- PWM frequency VS motor eRPM
- Sinusoidal Control of BLDCM with Hall Sensors Based
- Self-Learn Hall Sensor Calibration Mode
- STM8S105 Alternatives
- PID algorithm - negative output values
- Regeneration
- FOC
Datasheets and application notes
- STM8S105C6T6
- Endless-sphere.com forum messages
- 2017.04.25 - Initial forum message
- 2017.05.08 - First flash and debug on a dev board
- 2017.05.18 - First code flashing and running
- 2017.05.20 - more new information
- 2017.08.23 - SxxP versus SxxS versus LSW-675
- 2017.09.01 - Trying to figure out an algorithm to automatically adjust ui8_position_correction_value
- 2017.09.02 - How to do FOC on the BMSBattery S06S/Kunteng STM8 motor controllers
- 2017.09.03 - more ideas about zero crossing for FOC
- 2017.09.05 - measuring IQ current and manually adjusting position_correction_value
- 2017.09.15 - our OpenSource firmware efficiency compared to Lishui 12 FET FOC
- 2017.09.19 - measuring motor current
- 2017.10.23 - FOC and no FOC comparison
- 2018.01.10 - How to measure FOC_READ_ID_CURRENT_ANGLE_ADJUST
- 2018.02.20 - Reading motor phase current from the DC link current (shunt)
stm8-binutils-gdb
Install STM8 binutils, following the original instructions that can be found on the STM8 binutils: https://stm8-binutils-gdb.sourceforge.io/
As a backup, you can find the instructions and source files here also.
NOTE: to install in a specific directory, first define and export PREFIX, like this:
$ PREFIX=/home/cas/software/stm8-binutils
$ export PREFIX
Where “cas” is my user name on Linux Ubuntu.
You need to add it to your /home/cas/.profile file.
export PATH=$PATH:/home/cas/software/stm8-binutils/bin/
---
STM8 toolchain with GDB debugger and SDCC for cygwin
This is the open source STM8 development toolchain effort with binutils, gdb, gas, openocd and sdcc. STM8 is a 8-bit microcontroller platform from STMicroelectronics. Everything is based on the latest versions of the sources.
gdb 7.12.1
binuils 2.27
openocd 0.10.0
sdcc 3.6.0
Contributions are welcome, testing the tools is of course the main issue. If you have suggestions, bug reports or wishes post a comment to the stm8-binutils-gdb discussion forum.
DOWNLOAD
Precompiled binaries for cygwin can be found here:
https://sourceforge.net/projects/stm8-binutils-gdb/files
| Linked file: stm8-binutils-gdb-sources-2017-04-23.tar.gz |
GDB
A new stm8 target was added to gdb. In addition two new remote settings were added to facilitate debugging with IDE's like eclipse. These settings will make gdb behave like if it is debugging native code removing the necessity to use remote, load and continue commands.
set remote run-connect on (default is on)
The run-connect setting makes gdb automatically connect to localhost port 3333 (openocd server port) when run command is entered.
set remote run-load on (default is on)
The run-load setting makes gdb automatically load the program when run command is entered.
BINUTILS
The regular tools like ld, objcopy, readelf, objdump etc.
GAS
A new stm8 assembler (as).
OPENOCD
A new target for stm8 in addition to updated and fixed SWIM support. Hopefully this will be merged upstream.
SDCC
SDCC already had a back end for stm8. Unfortunately not so much debugging info although most of the debugging code was already available. However it is still lacking dwarf CFI (call frame info) so sdcc hade to be patched to use a frame pointer to assist gdb unwinding the stack. The soft frame pointer register is enabled with the --debug and --out-fmt-elf option. The sdlk linker was updated to supply proper entry point address in the ELF header.
The startup code now also includes initialization of the stackpointer.
BUILDING BINARIES
Building the binaries is basically the process of downloading the sources and applying the patches. There are helper scripts to assist with the process. In addition there are also config scripts for sdcc, openocd and binutils-gdb. If you want explicit configuration options edit these config scripts.
First set your installation directory if you want it in a specific location. Otherwise skip this step to keep the default(s).
export PREFIX=<path>
To download, patch and configure:
./patch_binutils.sh
./configure_binutils.sh
./patch_sdcc.sh
./configure_sdcc.sh
Until stm8 openocd official binaries are available:
./patch_openocd.sh
./configure_openocd.sh
Next step is the regular building and install:
cd binutils-gdb
make
make install
cd ..
cd sdcc-3.6.0
make
make install
cd ..
cd openocd-0.10.0
make
make install
cd ..
BINARIES
The (separately) supplied binaries are for cygwin-32. The binaries require a number of dynamic libraries (dll’s) not available in the supplied archives. Until a setup script for obtaining these libraries automatically is available they have to be installed with cygwin setup program. A good way to figure out what packages to download is to use cygwin package search.
The required libraries are:
cygexpat-1.dll => /usr/bin/cygexpat-1.dll (0x58c80000)
cygftdi1-2.dll => /usr/bin/cygftdi1-2.dll (0x67e00000)
cyggcc_s-1.dll => /usr/bin/cyggcc_s-1.dll (0x5bca0000)
cygiconv-2.dll => /usr/bin/cygiconv-2.dll (0x4b790000)
cygintl-8.dll => /usr/bin/cygintl-8.dll (0x43ca0000)
cyglzma-5.dll => /usr/bin/cyglzma-5.dll (0x3f200000)
cygncursesw-10.dll => /usr/bin/cygncursesw-10.dll (0x42200000)
cygstdc++-6.dll => /usr/bin/cygstdc++-6.dll (0x3aa10000)
cygusb0.dll => /usr/bin/cygusb0.dll (0x39950000)
cygz.dll => /usr/bin/cygz.dll (0x36f50000)
USAGE EXAMPLES
Compiling with sdcc and debug info:
sdcc -mstm8 led.c --out-fmt-elf --all-callee-saves --debug --verbose --stack-auto --fverbose-asm --float-reent --no-peep
launch openocd in a second shell:
openocd.exe -f interface/stlink-v1.cfg -f target/stm8.cfg -c "init" -c "reset halt"
or if you will be using stlink-v2:
openocd.exe -f interface/stlink-v2.cfg -f target/stm8.cfg
Then start gdb:
stm8-gdb test.elf --tui
start
or if you prefer to load manually:
stm8-gdb test.elf --tui
target extended-remote localhost:3333
load
break main
continue
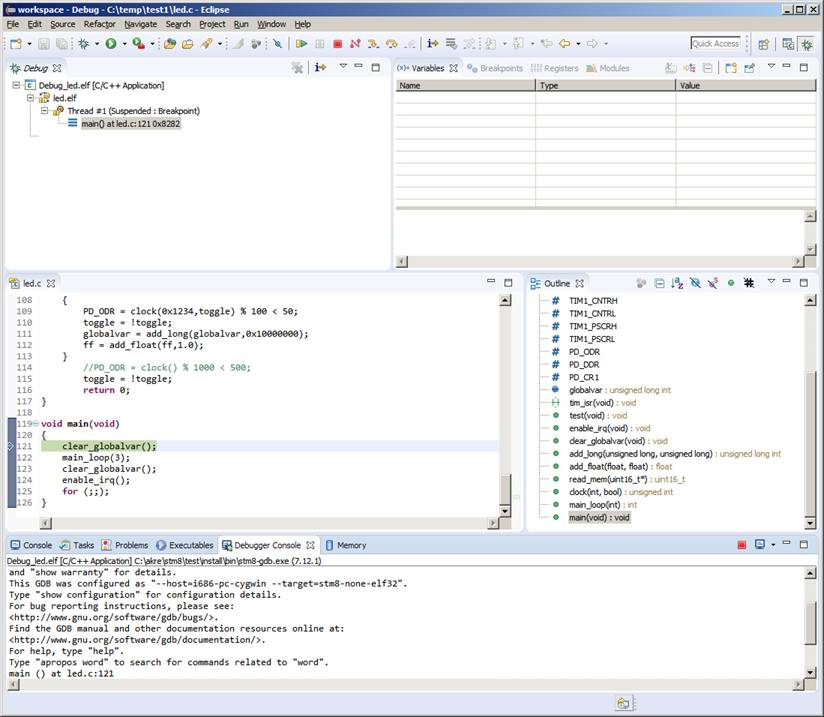
USING ECLIPSE CDT AS GDB FRONTEND
Using eclipse cdt as gdb front end is now much more straight forward with the modifications of the way gdb ‘run’ command works. What is happening when ‘start’ or ‘run’ command is entered is gdb automatically connects to openocd server on localhost:3333. This is similar to entering the commands ‘target ext localhost:3333’ and ‘load’ then ‘continue’ which is familiar to you who are used to debug with ‘Insight gdb’ or gdb with TUI (which is not that bad actually).
To create a ’debug’ project in eclipse, open ‘File’ menu and click ‘Import’. Click ‘C/C++ Executable’.
Click ‘Next’
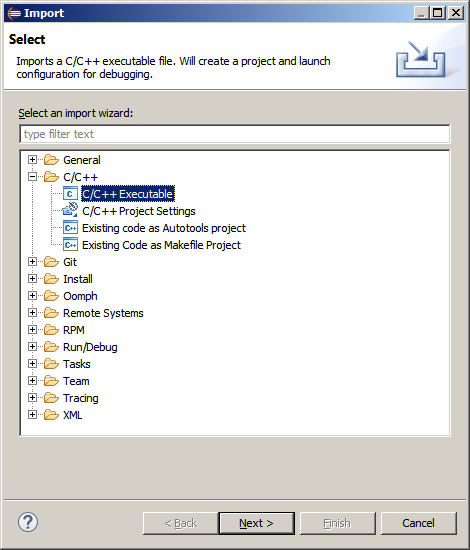
In the Import Executable dialog browse to your elf file you wish to debug.
Click ‘Next’.
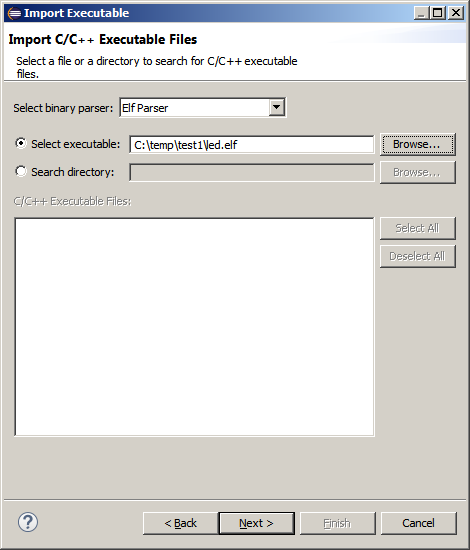
Now a project will be created. Use the defult settings or change project name.
Click Finish.

Now the ’Debug Configurations’ dialog is automatically shown.
Click the ‘Debugger’ tab.
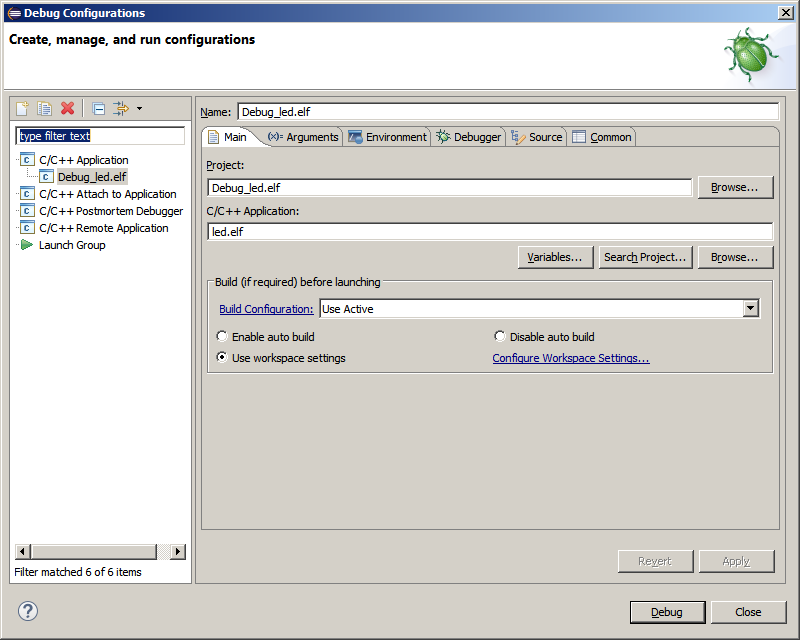
Browse to where the stm8-gdb.exe binary is located.
Next select ‘Source’ tab.
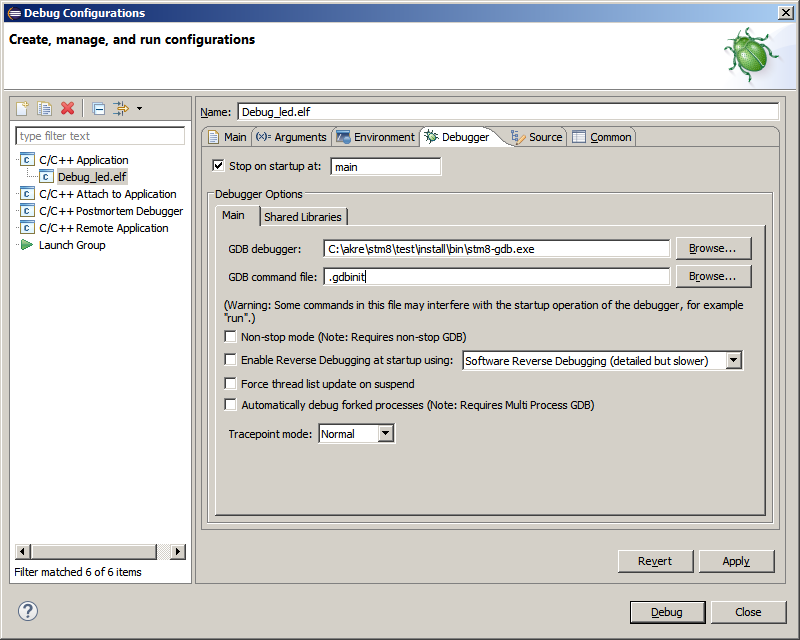
To use eclipse in windows with cygwin as ‘operating system’ for gdb some configuration of eclipse is necessary. This step is specific when using cygwin and can be skipped if you use eclipse with Linux.
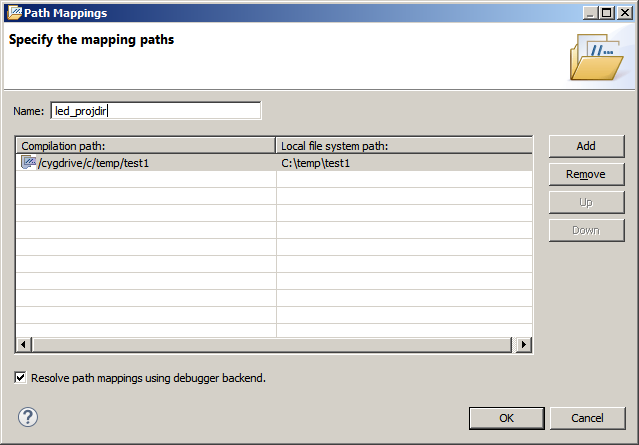
We have to map the path relations between cygwin and windows. Basically what happens is when gdb sees a reference to ‘/cygdrive/c/temp/test’ it will be converted into a windows path ‘c:/temp/test1’.
Under the tab ‘Source’ click Add and then ‘Path Mapping’

In the Path Mappings dialog enter the cygwin path and the windows path.
Click OK.
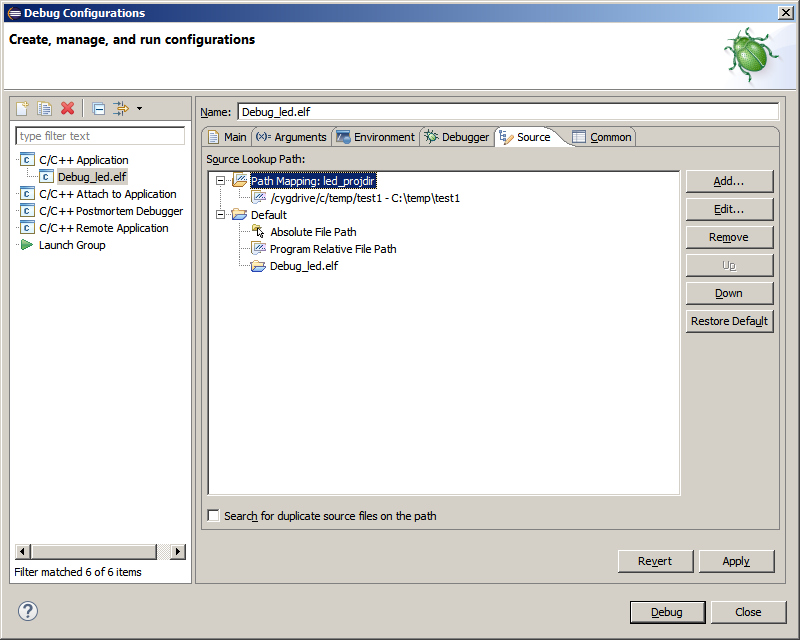
Now it should look like this:
Click Apply then Debug
The program should load and break on the first line in main():